
nette.pl – Dorm Internet · guide for students
How to set up your PPPoE Internet connection
Windows 11 · macOS · Linux · TP-Link · Mercusys · ASUS
What is PPPoE?
It is a way of connecting to the Internet where – just like when logging in to your e-mail – you enter a login and password. Without them the cable is plugged in, but there is no Internet. You get the login and password from the dorm administration: they are in your welcome message (SMS or e-mail).
- Your connection details
- Login and password – from the welcome message, type them exactly (letters are case-sensitive). PPPoE service name – leave empty. One account = one connection at a time.
- Speed and top-ups
- Student panel: https://akademiki.nette.pl (log in with the same login and password).
- Where to get help
- First contact the dorm staff (dorm administration); if they cannot help you, contact Virtual Telecom sp. z o.o. by e-mail at akademiki@nette.pl or by phone, customer service 81 458 20 20, opening hours: Mon–Fri 8:00–16:00.
Windows 11
Broadband PPPoE connection built into the system – no extra software
Before you start – get ready
- PPPoE login and password – you have them in your welcome message (SMS or e-mail) or you will get them from the dorm administration.
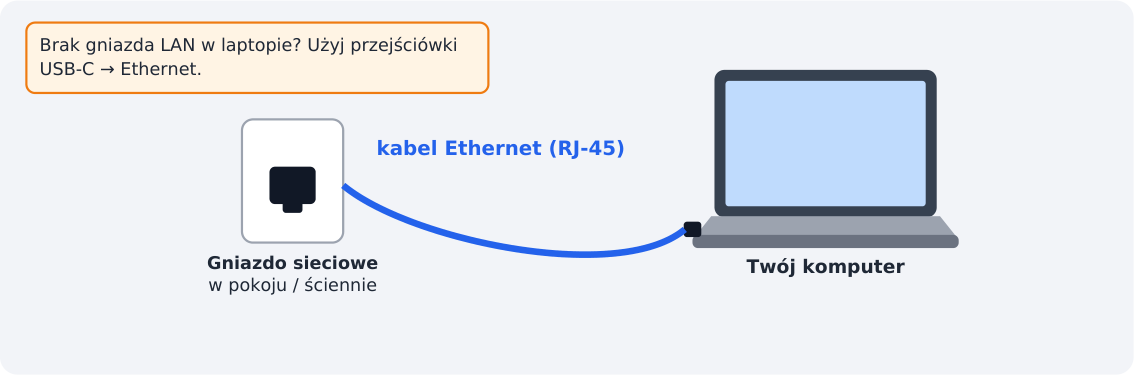
- Network cable (Ethernet, RJ-45) and a computer with a LAN port. Laptop without a port? Buy a USB / USB-C → Ethernet adapter.
- PPPoE on a computer works over cable only. Want Wi-Fi? Set up PPPoE on a router (TP-Link, Mercusys, ASUS tabs).
- Using a router with PPPoE? Then do not set up PPPoE on the computer – the router does it for you.
Step 1: Plug in the network cable
Plug one end of the cable into the wall socket and the other into the LAN port of your computer.
Step 2: Open Settings → Network & Internet
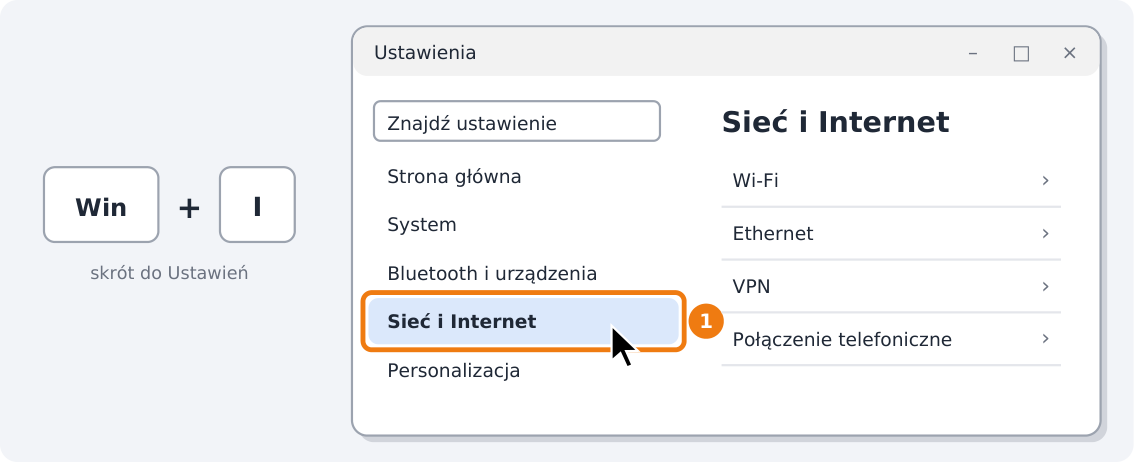
Press Win + I (or right-click Start → Settings). In the left menu choose Network & Internet.
Step 3: Dial-up → Set up a new connection
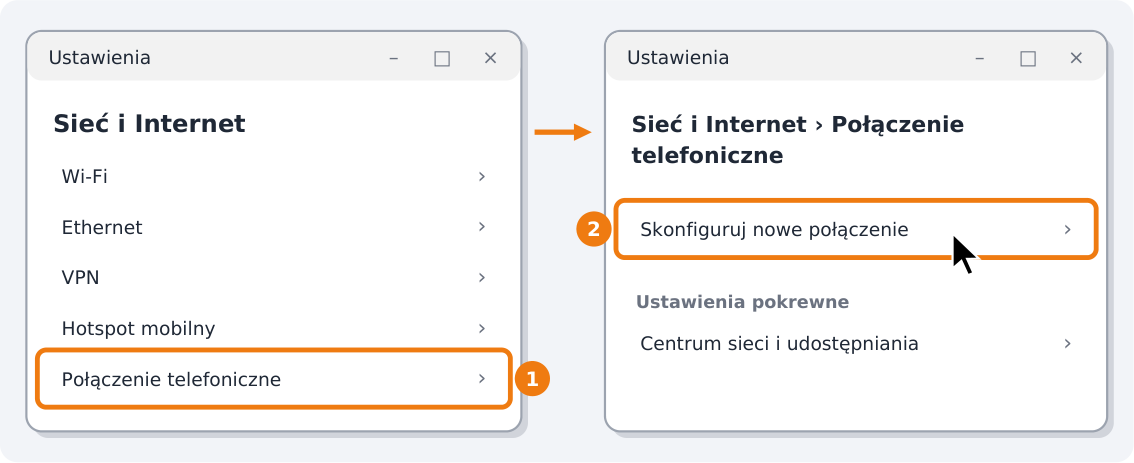
Click Dial-up (don’t mind the name – this is where PPPoE lives), then Set up a new connection.
Step 4: Choose “Connect to the Internet”
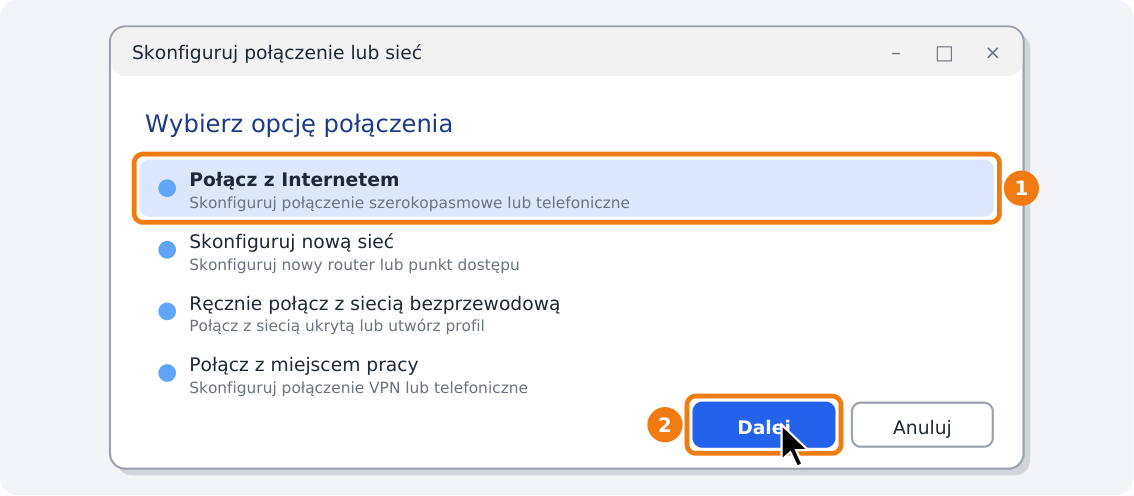
Select the first option Connect to the Internet and click Next.
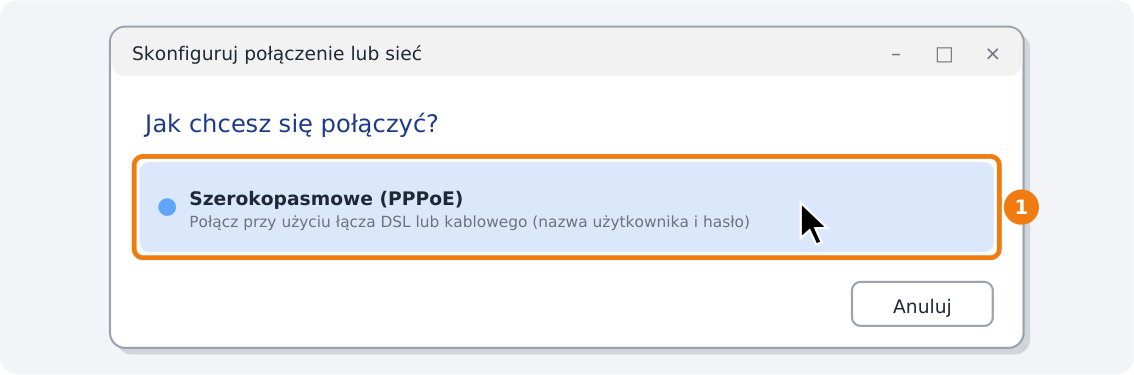
Step 5: Click “Broadband (PPPoE)”
This is the only option you need. If Windows asks “Do you want to use a connection that you already have?”, choose No, create a new connection.
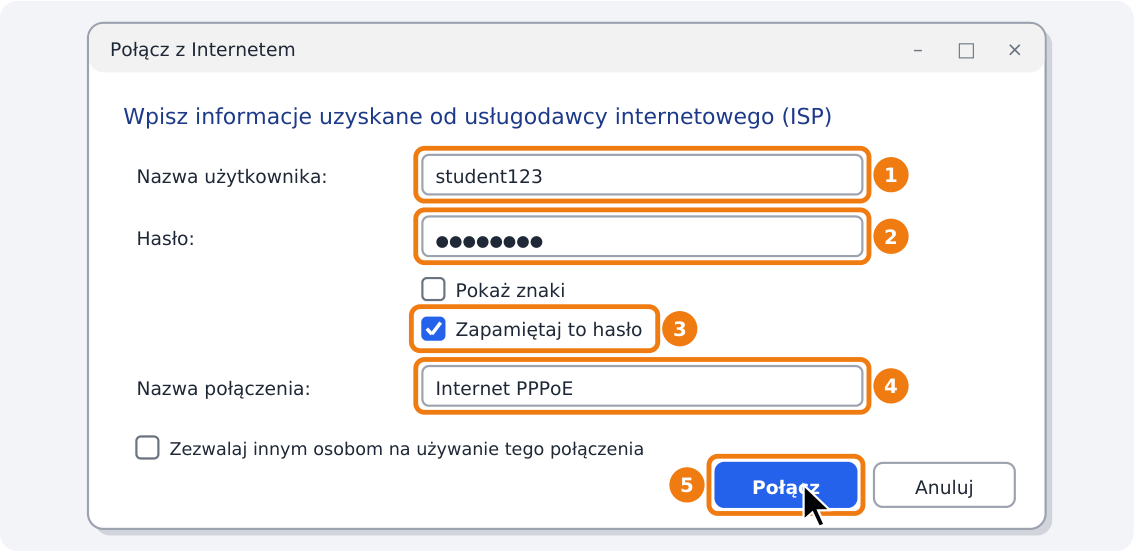
Step 6: Enter your login and password, then “Connect”
1 login, 2 password, 3 tick Remember this password, 4 type any name (e.g. Internet PPPoE), 5 click Connect. After a moment you will see “The connection to the Internet is ready to use”.
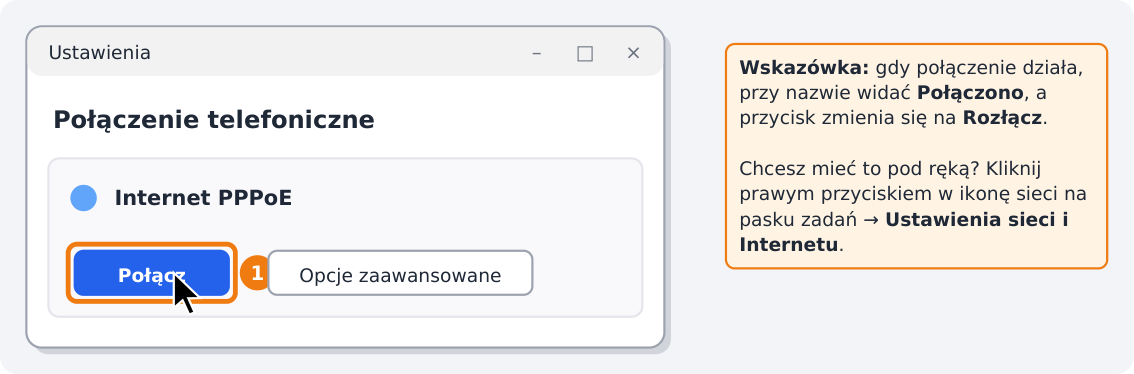
Step 7: How to connect next time
Windows does not reconnect PPPoE by itself after a restart. Go to Settings → Network & Internet → Dial-up and click Connect next to your connection. When the connection works, “Connected” appears next to its name. Want it handy? Right-click the network icon on the taskbar → Network and Internet settings.
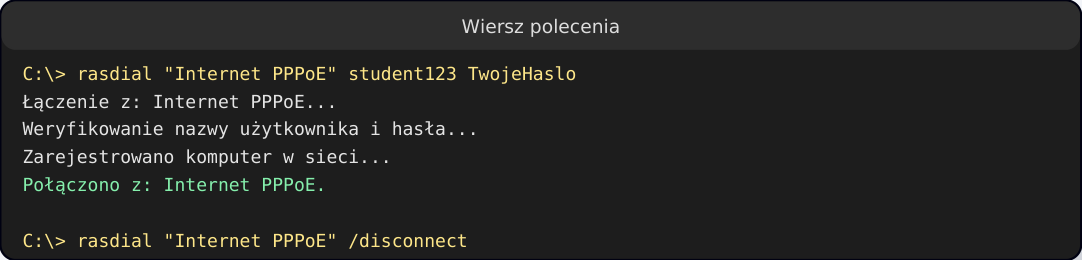
Step 8: (Optional) Connect automatically at startup
The connection can be started with a single rasdial command. Save it in a connect.bat file and put a shortcut in the Startup folder (Win + R → type shell:startup → Enter). Note: the .bat file stores the password in plain text – do not share it and do not use it on a shared computer.
Something not working? Common problems
- Error 691
- Type the login and password exactly as in the message – letters are case-sensitive, no trailing spaces. The easiest way is to copy and paste them.
- Error 651, 678 or 815
- The computer cannot see our network: the cable is not plugged in, is damaged, or the socket in your room is not active. Check that the LEDs next to the laptop port are lit, try another cable and make sure you create the connection on the wired adapter, not Wi-Fi. If the LED stays off even with a new cable – report the socket to the dorm administration.
- Connected, but web pages don’t open
- Disconnect and connect again. Check that no VPN is on. Restart the computer.
- It connects, but drops after a few dozen seconds or minutes (over and over again)
- Most common cause: a USB-Ethernet adapter put to sleep by power saving or a loose / damaged cable – the computer briefly loses link and the PPPoE session drops. Check in this order: (1) replace the network cable and make sure the plugs click into the wall socket and the adapter; (2) if you use a USB adapter – plug it into another USB port, preferably directly into the computer, not through a hub; (3) turn off power saving for the adapter: Windows: Device Manager → Network adapters → your adapter → Properties → Power Management → untick “Allow the computer to turn off this device to save power”; the same under Universal Serial Bus controllers for USB Root Hub. Also: Settings → System → Power → power mode “Best performance” while on cable. If the LED next to the port still goes off and on after replacing the cable – report the wall socket to the dorm administration.
- It worked, then suddenly stopped
- In our network one account = one connection at a time (the account has a fixed address). Check that the same login is not set up on the computer and on the router at the same time, or on two devices.
macOS
Ventura, Sonoma, Sequoia and newer – a PPPoE service in System Settings
Before you start – get ready
- PPPoE login and password – you have them in your welcome message (SMS or e-mail) or you will get them from the dorm administration.
- Network cable (Ethernet, RJ-45) and a computer with a LAN port. Laptop without a port? Buy a USB / USB-C → Ethernet adapter.
- MacBooks usually have no LAN port – you need a USB-C → Ethernet adapter (or a docking station with a LAN port).
- Using a router with PPPoE? Then do not set up PPPoE on the computer – the router does it for you.
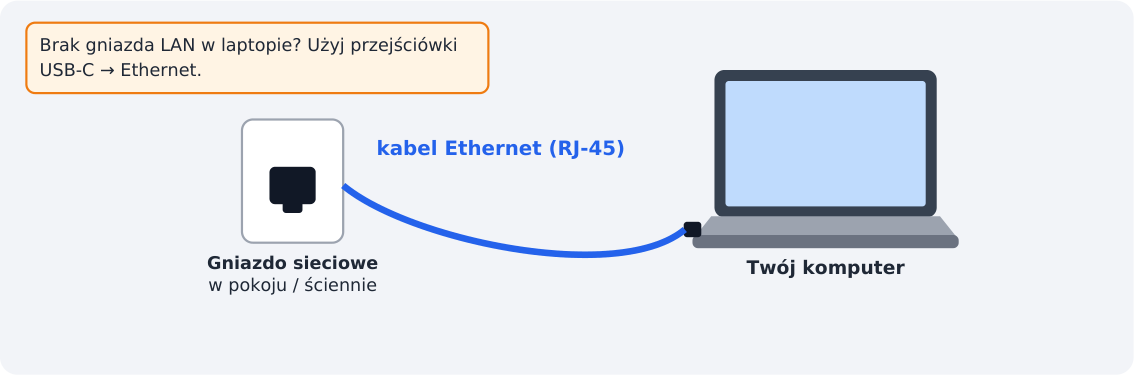
Step 1: Plug in the network cable
Plug the cable into the wall socket and into the adapter / Ethernet port of your Mac.
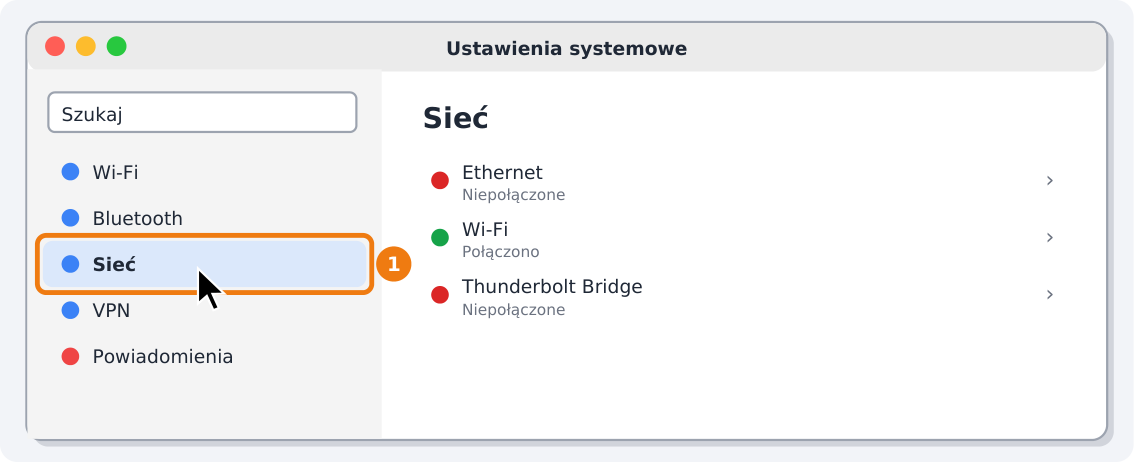
Step 2: Open System Settings → Network
Click the Apple logo in the top-left corner of the screen → System Settings…, then choose Network in the left panel.
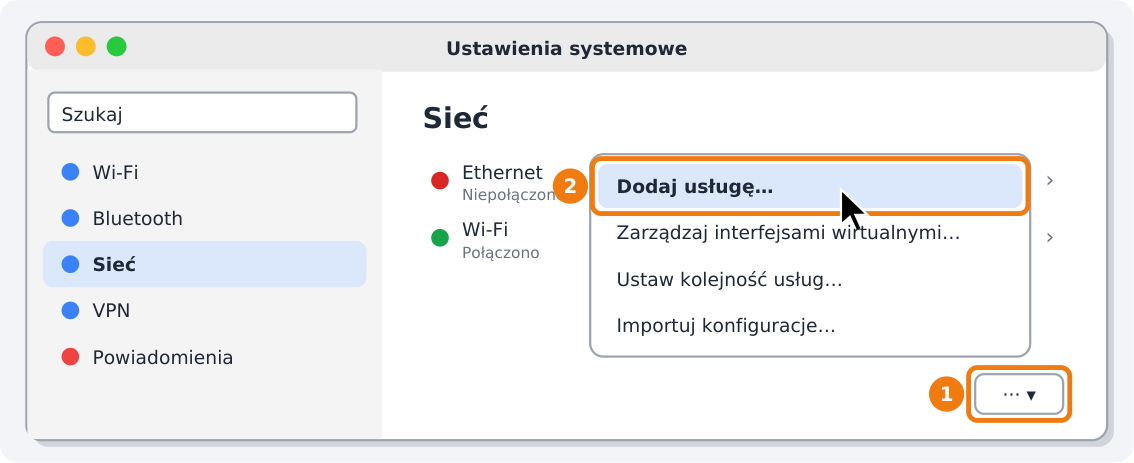
Step 3: Click “···” → “Add Service…”
Below the list of connections (bottom right) there is a button with three dots ···. Click it and choose Add Service….
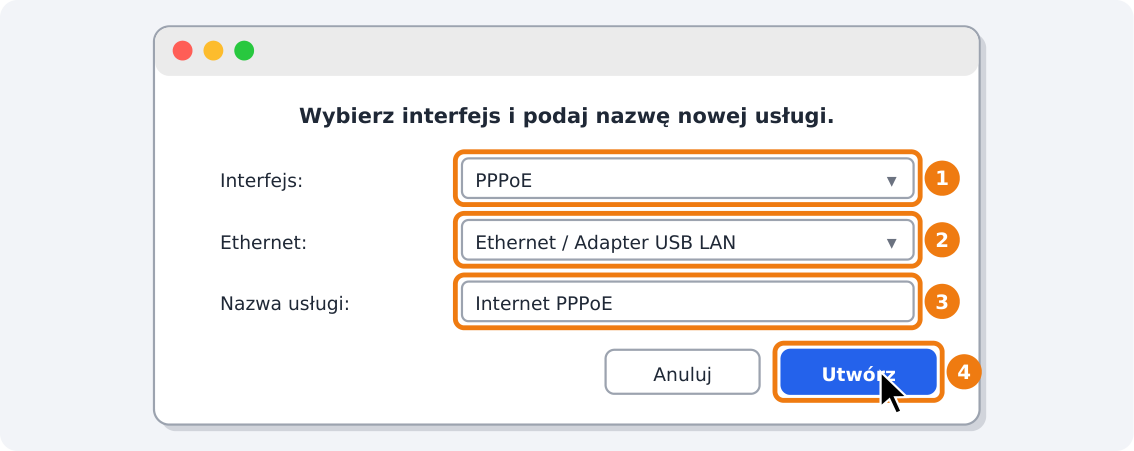
Step 4: Set the PPPoE interface
1 Interface: PPPoE. 2 Ethernet: choose your adapter (e.g. USB 10/100/1000 LAN). 3 Service Name: anything, e.g. Internet PPPoE. 4 Click Create.
Step 5: Enter your login and password, click “Connect”
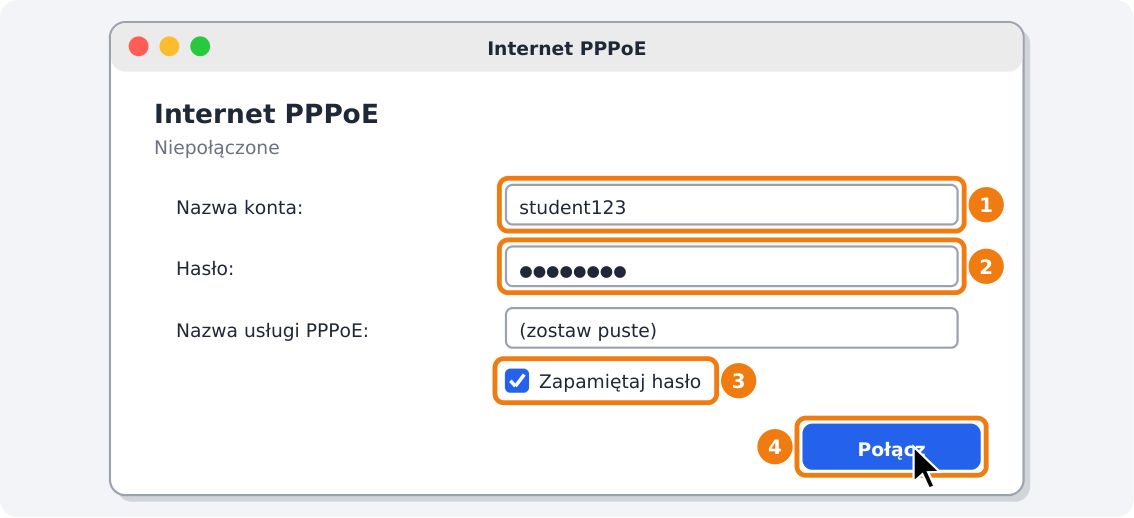
Click the new Internet PPPoE service in the list (or the Details… button). Enter 1 the account name (login), 2 the password, 3 tick Remember password. Leave the PPPoE Service Name field empty. 4 Click Connect.
Step 6: Check the status – green dot = working
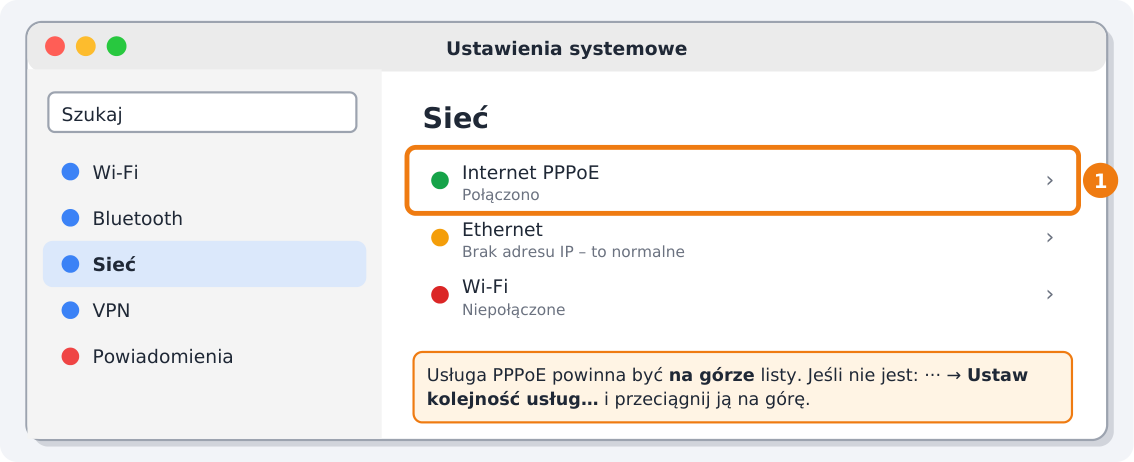
“Connected” appears next to the service. In the service options (Details… → PPP / Options) you can tick Connect automatically when needed so the Mac connects on its own. The PPPoE service should be at the top of the list; if it is not: ··· → Set Service Order… and drag it to the top.
Something not working? Common problems
- “Could not authenticate” / wrong login
- Type the login and password exactly as in the message – letters are case-sensitive, no trailing spaces. The easiest way is to copy and paste them.
- “The PPPoE server is not responding”
- The cable is not plugged in or the socket is not active. Check that the LEDs next to the adapter port are lit. Try another cable. Also check that the right Ethernet adapter was chosen in step 4.
- Connected, but web pages don’t open
- Disconnect and connect again. Check that no VPN is on. Restart the computer.
- It connects, but drops after a few dozen seconds or minutes (over and over again)
- Most common cause: a USB-Ethernet adapter put to sleep by power saving or a loose / damaged cable – the computer briefly loses link and the PPPoE session drops. Check in this order: (1) replace the network cable and make sure the plugs click into the wall socket and the adapter; (2) if you use a USB adapter – plug it into another USB port, preferably directly into the computer, not through a hub; (3) turn off power saving for the adapter: macOS: in System Settings → Network check that the adapter does not “flicker” between Connected and Not Connected; plug the adapter directly into the Mac (USB-C / Thunderbolt), not through a hub, and in Settings → Battery → Options turn off sleeping on power adapter when the computer should stay online. If the LED next to the port still goes off and on after replacing the cable – report the wall socket to the dorm administration.
- It worked, then suddenly stopped
- In our network one account = one connection at a time (the account has a fixed address). Check that the same login is not set up on the computer and on the router at the same time, or on two devices.
Linux
Ubuntu, Mint, Fedora, Debian… – NetworkManager (graphical window or nmcli)
Before you start – get ready
- PPPoE login and password – you have them in your welcome message (SMS or e-mail) or you will get them from the dorm administration.
- Network cable (Ethernet, RJ-45) and a computer with a LAN port. Laptop without a port? Buy a USB / USB-C → Ethernet adapter.
- PPPoE on a computer works over cable only. Want Wi-Fi? Set up PPPoE on a router (TP-Link, Mercusys, ASUS tabs).
- This guide covers distributions with NetworkManager (default in Ubuntu, Mint, Fedora, Debian with GNOME/KDE).
- GNOME Settings cannot create PPPoE – we will use the Network Connections program (nm-connection-editor) or the nmcli command.
Step 1: Plug in the cable and check the network card name
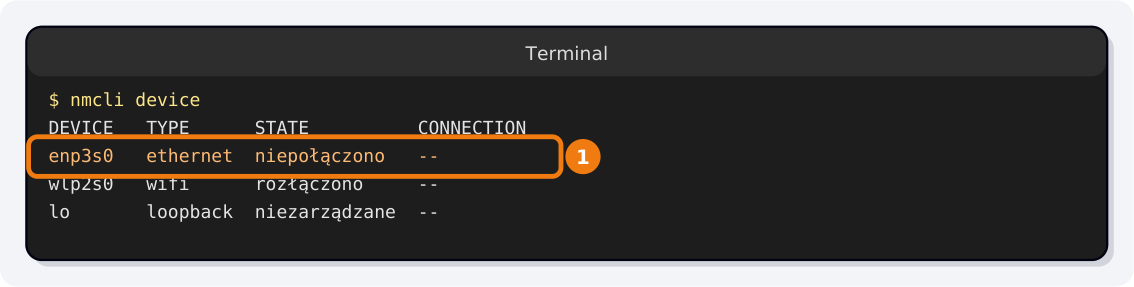
Open a Terminal (Ctrl + Alt + T) and type nmcli device. Note the name of the ethernet device – e.g. enp3s0 or eth0. You will need it in a moment.
Step 2: Open “Network Connections” and click “+”
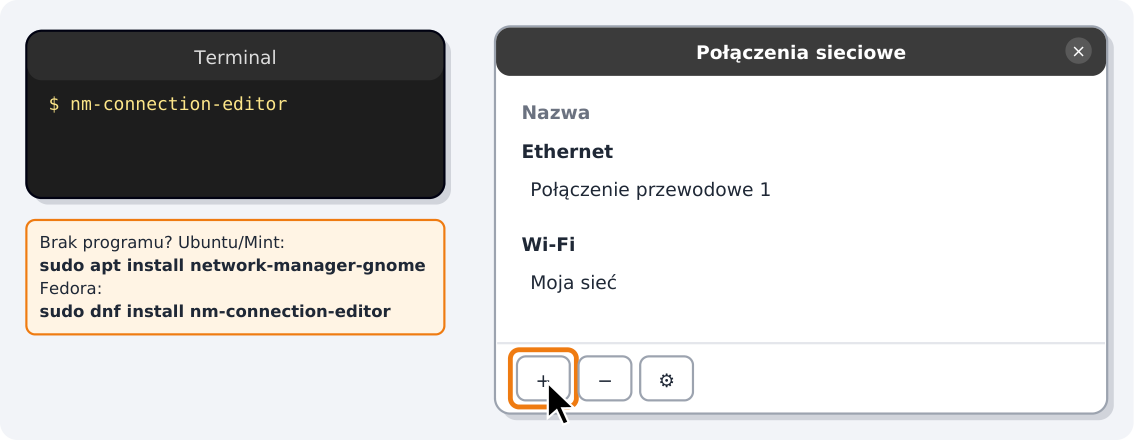
Search the application menu for Network Connections (Advanced Network Configuration) or type nm-connection-editor in the terminal. Click + at the bottom of the window. Program missing? Ubuntu/Mint: sudo apt install network-manager-gnome, Fedora: sudo dnf install nm-connection-editor.
Step 3: Choose the “DSL/PPPoE” type → Create
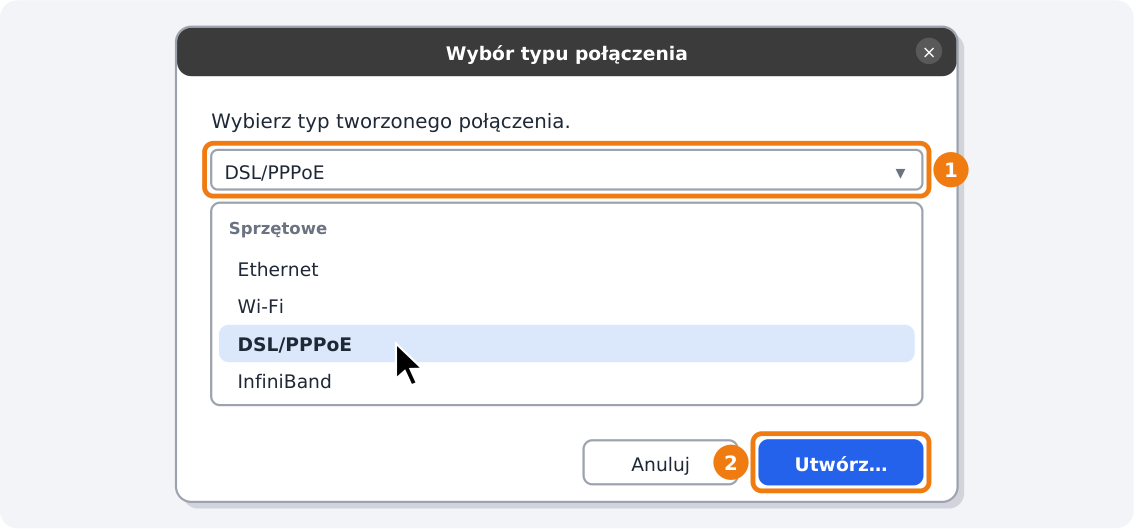
From the drop-down list choose DSL/PPPoE and click Create….
Step 4: Enter the PPPoE details and save
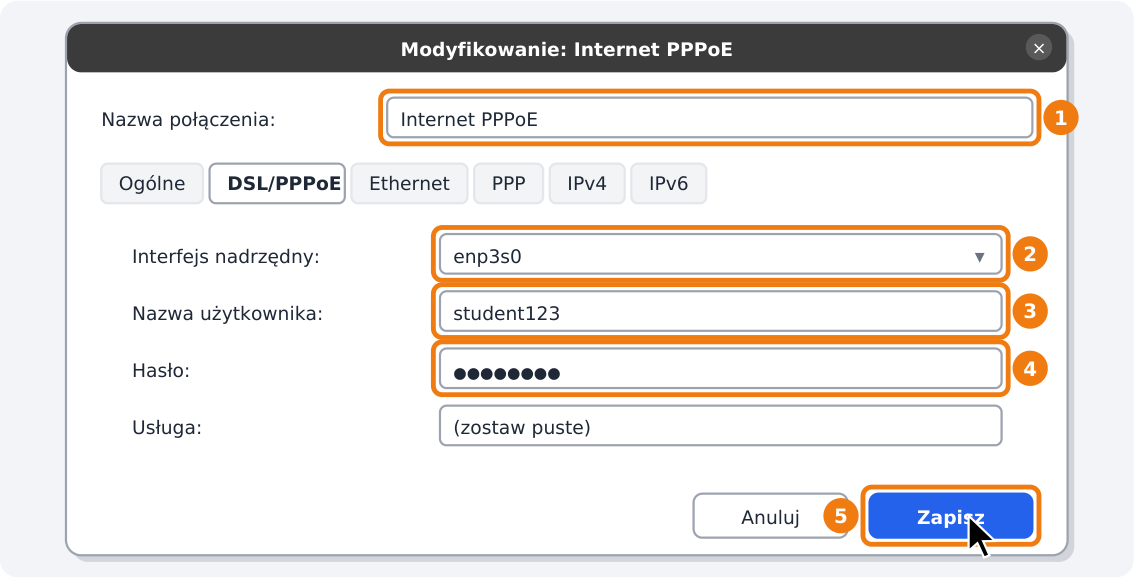
1 Give it a name. On the DSL/PPPoE tab: 2 parent interface = the card from step 1 (e.g. enp3s0), 3 username, 4 password, leave the Service field empty. 5 Save. On the General tab leave Connect automatically with priority ticked so it connects on its own.
Step 5: Connect and check
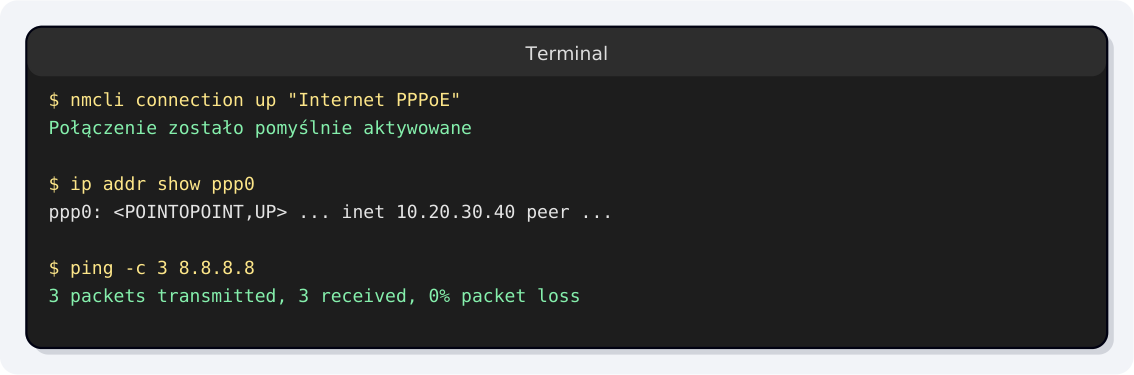
Turn the connection on in the network menu in the top-right corner of the screen, or with nmcli connection up "Internet PPPoE". A ppp0 interface with an IP address and a reply to ping 8.8.8.8 mean success.
Step 6: The express way – everything in the terminal
Instead of steps 2–4 you can create the connection with one command (replace enp3s0 with your card name and the login and password with yours; the password in single quotes protects special characters):
nmcli connection add type pppoe con-name "Internet PPPoE" \
      ifname enp3s0 username YourLogin password 'YourPassword'
nmcli connection up "Internet PPPoE"
# disconnect: nmcli connection down "Internet PPPoE"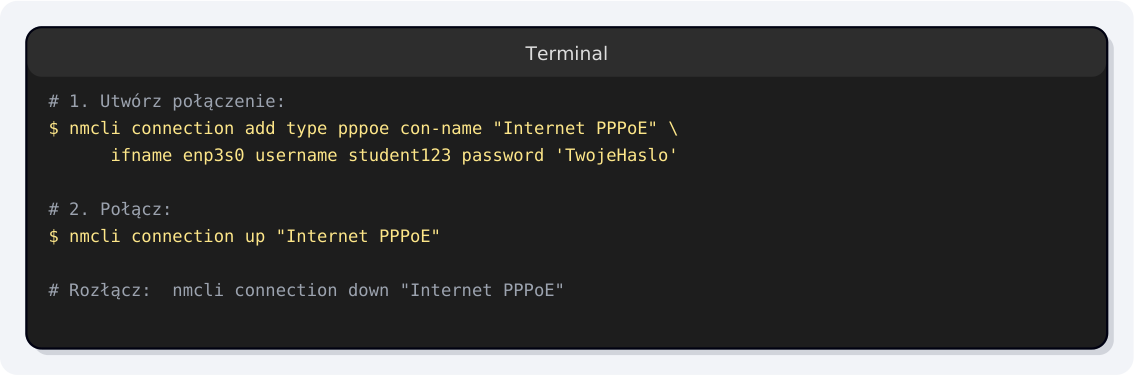
Something not working? Common problems
- Authentication error
- Type the login and password exactly as in the message – letters are case-sensitive, no trailing spaces. The easiest way is to copy and paste them. Logs:
journalctl -u NetworkManager -f - Timeout / no PPPoE server
- The cable is not plugged in or the socket is not active. Check the LEDs next to the port, try another cable. Check that the wired card, not Wi-Fi, was chosen as the parent interface.
- Connected, but web pages don’t open
- Disconnect and connect again. Check that no VPN is on. Restart the computer.
- It connects, but drops after a few dozen seconds or minutes (over and over again)
- Most common cause: a USB-Ethernet adapter put to sleep by power saving or a loose / damaged cable – the computer briefly loses link and the PPPoE session drops. Check in this order: (1) replace the network cable and make sure the plugs click into the wall socket and the adapter; (2) if you use a USB adapter – plug it into another USB port, preferably directly into the computer, not through a hub; (3) turn off power saving for the adapter: Linux: watch
dmesg -wwhile it drops – if you see “USB disconnect”/“link down”, disable autosuspend:echo -1 | sudo tee /sys/module/usbcore/parameters/autosuspend(permanently: kernel parameterusbcore.autosuspend=-1). If the LED next to the port still goes off and on after replacing the cable – report the wall socket to the dorm administration. - It worked, then suddenly stopped
- In our network one account = one connection at a time (the account has a fixed address). Check that the same login is not set up on the computer and on the router at the same time, or on two devices.
TP-Link router
Archer and other models with the new (blue and white) panel
Before you start – get ready
- PPPoE login and password from the welcome message (SMS or e-mail) or from the dorm administration.
- The router and a cable (usually in the box). A computer or phone for the setup.
- If you previously connected with PPPoE directly from your computer – disconnect that connection. In our network one account means one connection at a time.
- Second-hand router, or one that behaves “oddly”? Reset it: hold the Reset button for about 10 s (with a paper clip) until the LEDs blink.
Note: your router’s panel may look different
- The pictures are simplified diagrams of the Polish UI, not screenshots. The panel’s look, colours, order and menu names depend on the router model and firmware version.
- Can’t see exactly this option? Look for a similar one: Internet, WAN, Connection Type, PPPoE (Internet Connection Type, Username, Password, Save / Apply).
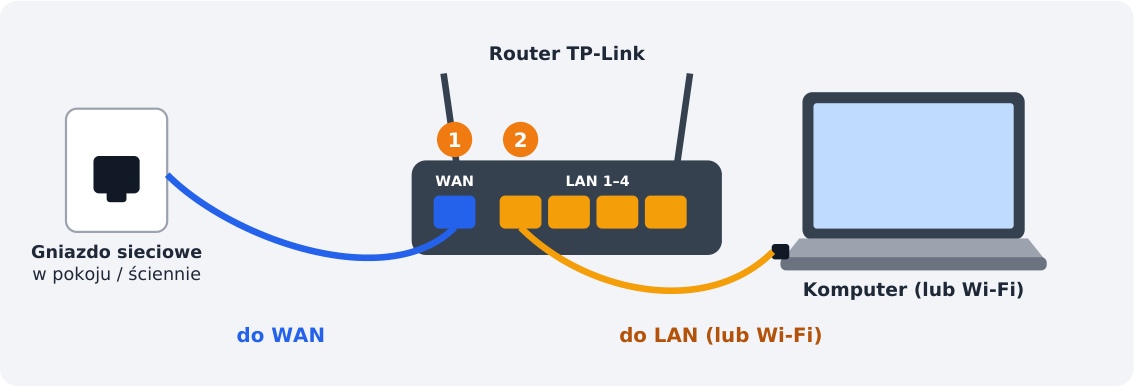
Step 1: Connect the cables
1 Plug the cable from the wall socket into the blue WAN / Internet port. 2 Connect the computer with a cable to one of the LAN ports, or join the router’s Wi-Fi – the network name and password are on the sticker underneath the device. Power it on and wait about 1–2 minutes.
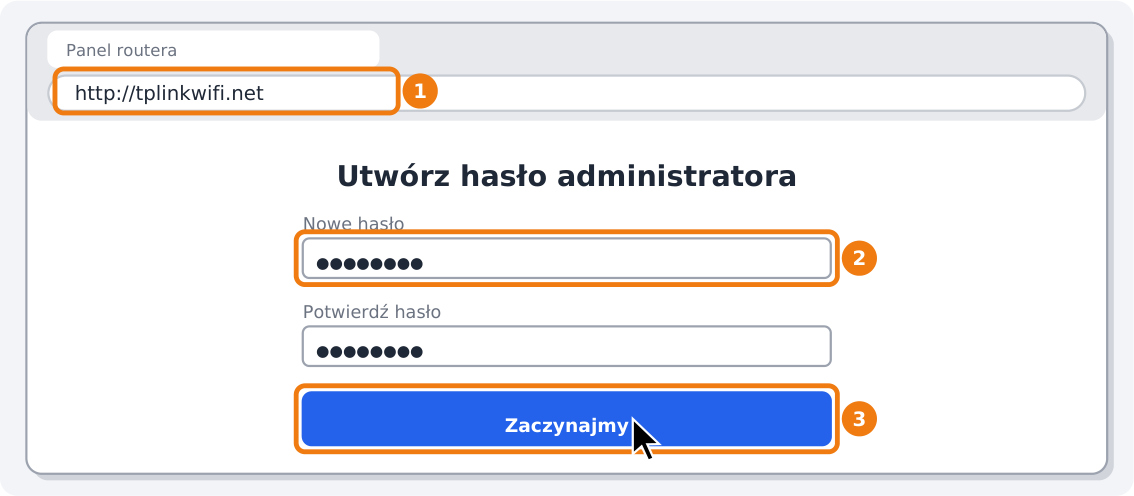
Step 2: Open the router’s panel in a browser
In the address bar type tplinkwifi.net (if it does not work: 192.168.0.1, older: 192.168.1.1). On first run set the router’s admin password – write it down, you will need it every time you log in. On first login the Quick Setup wizard starts – you can choose PPPoE right there and skip to step 4.
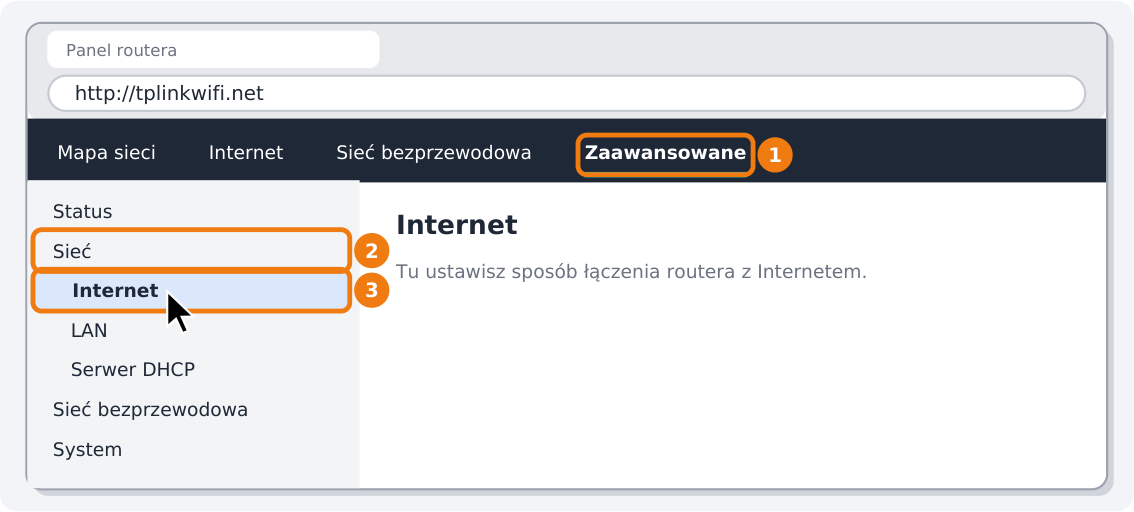
Step 3: Go to the Internet (WAN) settings
Log in to the panel and go to Advanced → Network → Internet (on some models the Internet tab at the top is enough). On your model the menu may be arranged slightly differently – look for the Internet or WAN section.
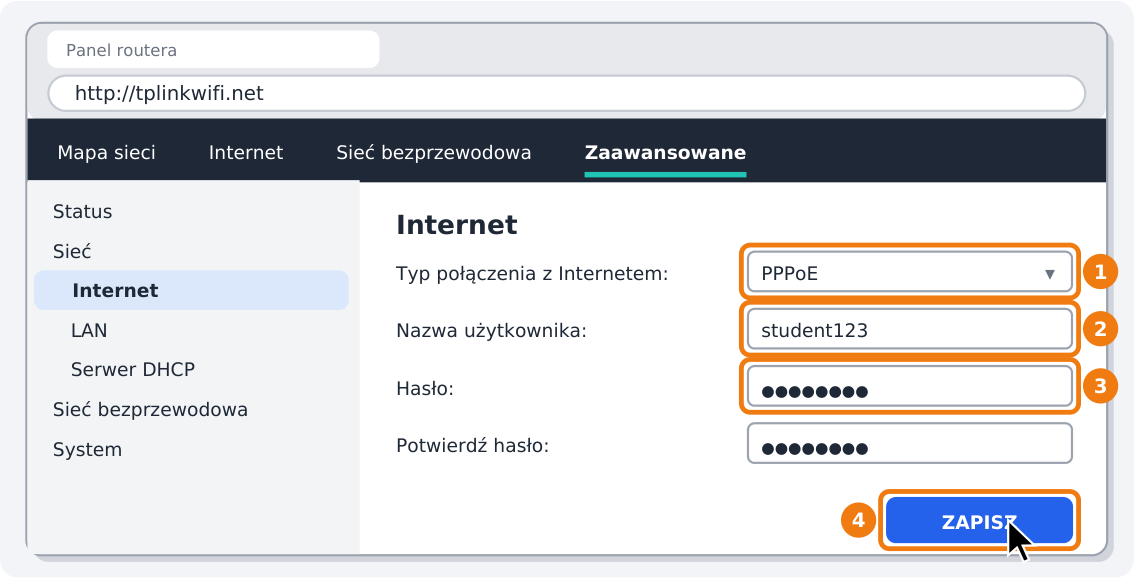
Step 4: Choose PPPoE, enter your login and password
1 Connection Type: PPPoE. 2 Username = your login. 3 Password (and its confirmation, if there is one). 4 Click SAVE. Leave the remaining settings (IP address, DNS, MTU, service name) at their defaults.
Step 5: Check that the router is connected to the Internet
Go back to the panel’s home page (Network Map / Status). The Internet status should change to Connected and the router should have an IP address (anything other than 0.0.0.0 = OK). Open any web page to be sure.
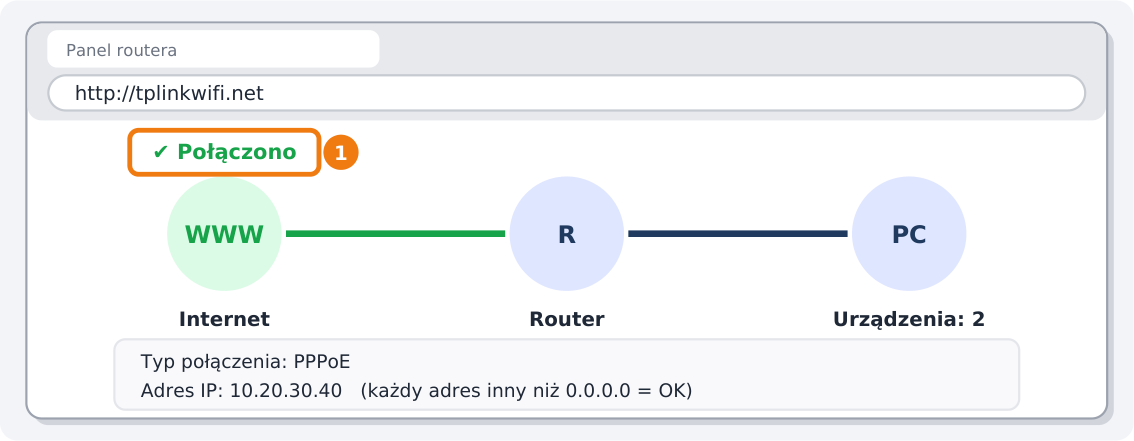
Step 6: Set your own Wi-Fi name and password
In Wireless (tab at the top) change the network name and set a strong password (at least 12 characters). After saving, your devices will disconnect – reconnect them with the new password.
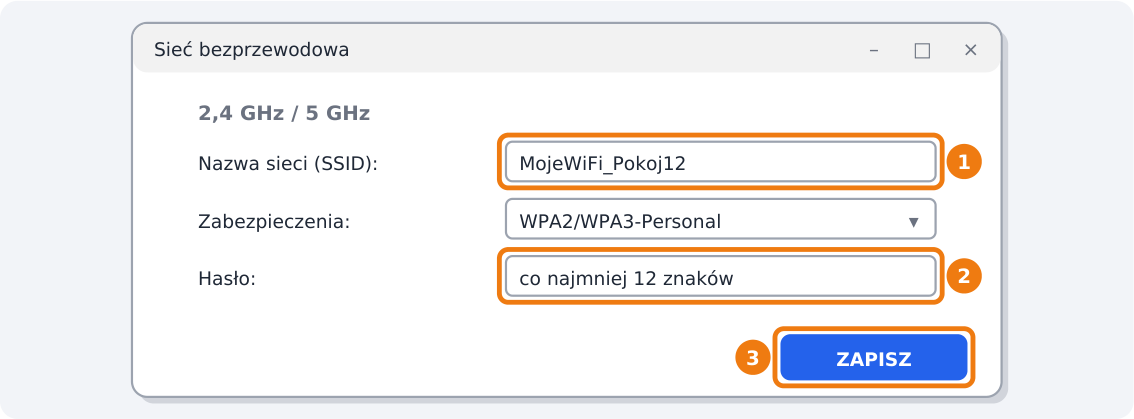
Something not working? Common problems
- tplinkwifi.net does not open
- Make sure you are connected to this router (by cable to a LAN port or to its Wi-Fi) and turn off mobile data on your phone. Try the address 192.168.0.1 (older: 192.168.1.1).
- Status “Disconnected” / authentication error
- Check the PPPoE login and password (case-sensitive). Make sure the cable from the wall socket is in the WAN port, not a LAN port.
- Connected, but only for a moment
- Two typical causes. (1) A second session is running on the same account (e.g. the computer still connects with PPPoE on its own) – turn it off and restart the router. (2) A loose or damaged cable between the wall socket and the WAN port – the router briefly loses link and the session drops; replace the cable and check that the plugs click.
- Internet works for a while, then disappears when nothing is downloading; it comes back after opening a page, or not at all
- The router’s PPPoE settings have connect on demand enabled (Dial on demand / Connect on demand with an idle time). The router disconnects the session when traffic drops and then cannot always resume it. This option must be off: set the connection mode to Always on / Connect automatically (Auto) and “Max idle time” (Idle timeout) to 0 or off. TP-Link: Advanced → Network → Internet → “Connection Mode”: Auto (not “On Demand” or “Manually”).
- No connection despite correct details
- Restart the router (power off for 30 s). If that does not help – write to the dorm administration, to akademiki@nette.pl, or call customer service: 81 458 20 20 (Mon–Fri 8:00–16:00).
- I forgot the router’s admin password
- Reset the router with the Reset button (about 10 s) and set it up again from step 2.
Mercusys router
MR / MW / Halo models with a browser panel or the app
Before you start – get ready
- PPPoE login and password from the welcome message (SMS or e-mail) or from the dorm administration.
- The router and a cable (usually in the box). A computer or phone for the setup.
- If you previously connected with PPPoE directly from your computer – disconnect that connection. In our network one account means one connection at a time.
- Second-hand router, or one that behaves “oddly”? Reset it: hold the Reset button for about 10 s (with a paper clip) until the LEDs blink.
Note: your router’s panel may look different
- The pictures are simplified diagrams of the Polish UI, not screenshots. The panel’s look, colours, order and menu names depend on the router model and firmware version.
- Can’t see exactly this option? Look for a similar one: Internet, WAN, Connection Type, PPPoE (Internet Connection Type, Username, Password, Save / Apply).
Step 1: Connect the cables
1 Plug the cable from the wall socket into the WAN port (usually a different colour or marked with a globe icon). 2 Connect the computer with a cable to one of the LAN ports, or join the router’s Wi-Fi – the network name and password are on the sticker underneath the device. Power it on and wait about 1–2 minutes.
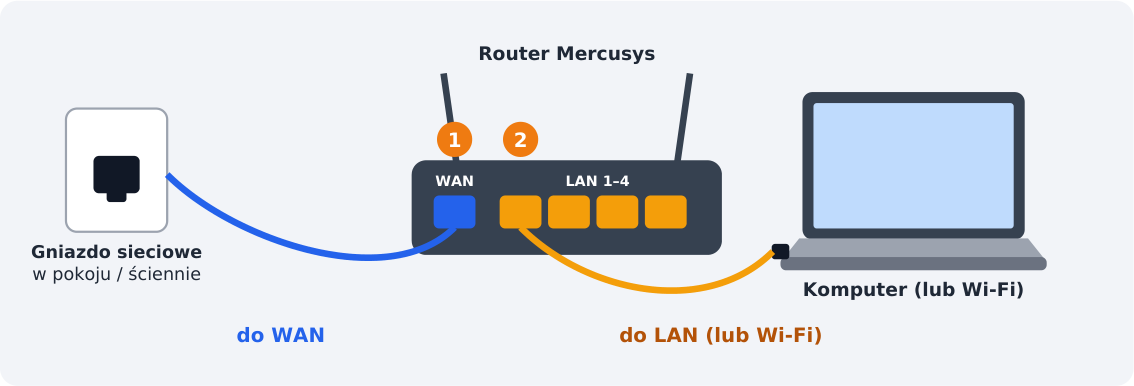
Step 2: Open the router’s panel in a browser
In the address bar type mwlogin.net (if it does not work: 192.168.1.1). On first run set the router’s admin password – write it down, you will need it every time you log in. On first login the Quick Setup wizard opens – choose PPPoE in it and enter the details from step 4.
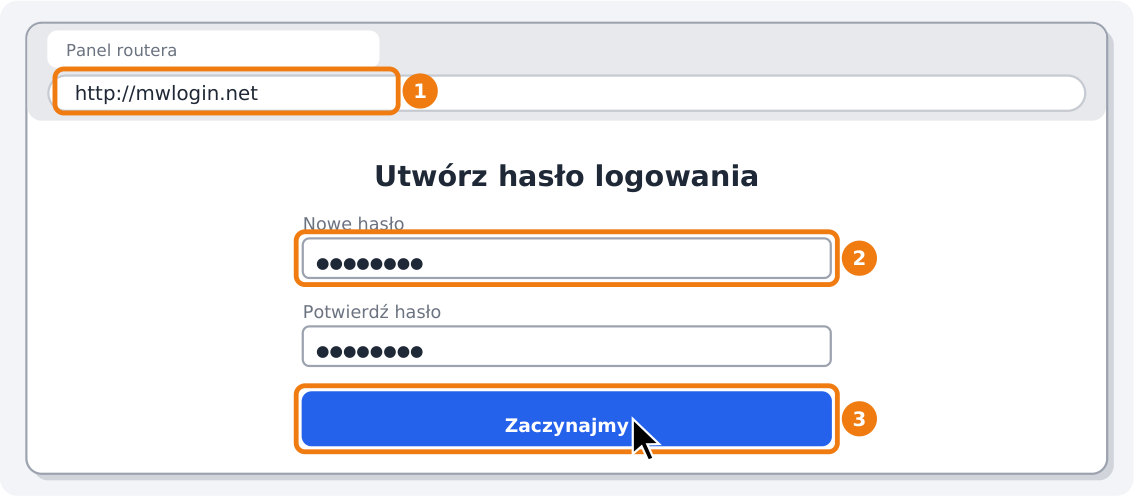
Step 3: Go to the Internet (WAN) settings
Log in to the panel and go to Advanced → Network → Internet (on older models: Advanced Settings → Network → WAN). On your model the menu may be arranged slightly differently – look for the Internet or WAN section.
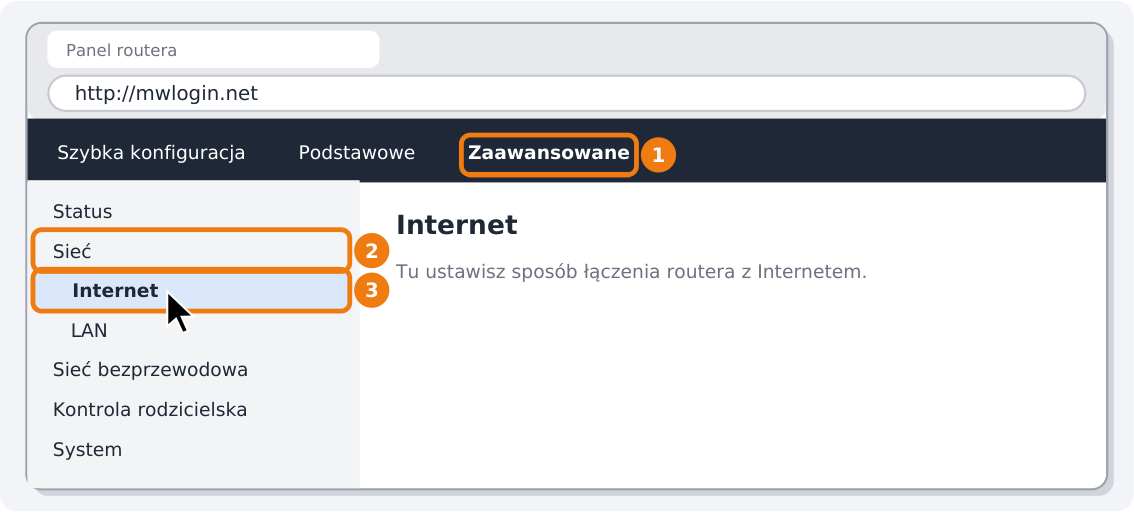
Step 4: Choose PPPoE, enter your login and password
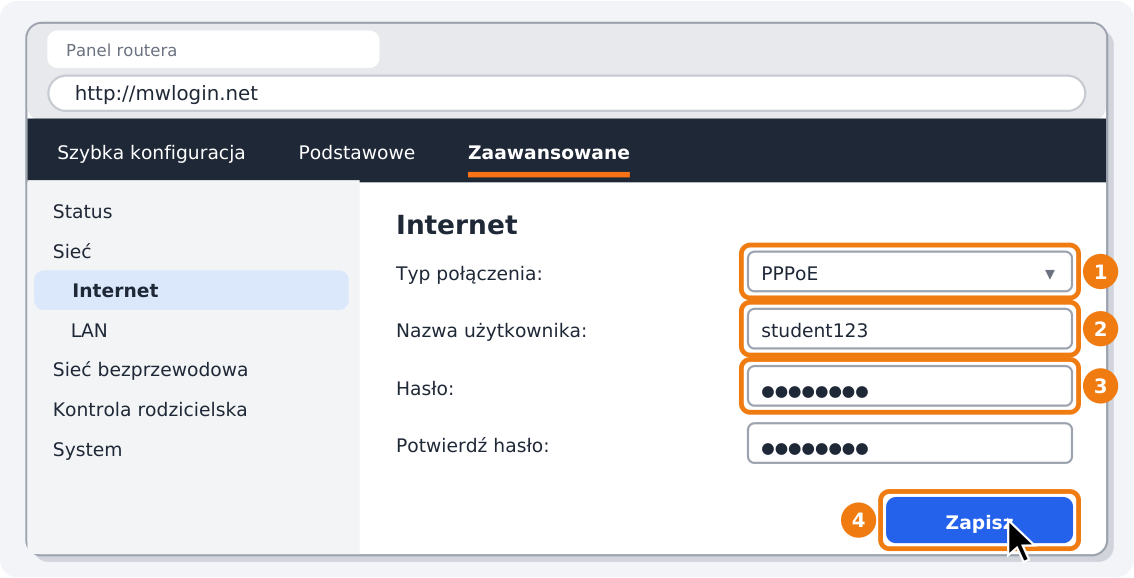
1 Connection Type: PPPoE. 2 Username = your login. 3 Password (and its confirmation, if there is one). 4 Click Save. Leave the remaining settings (IP address, DNS, MTU, service name) at their defaults.
Step 5: Check that the router is connected to the Internet
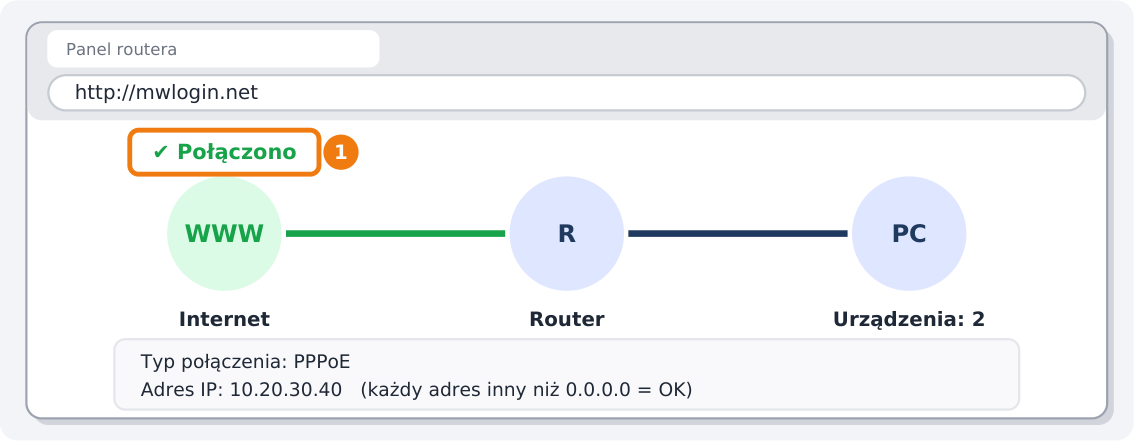
Go back to the panel’s home page (Network Map / Status). The Internet status should change to Connected and the router should have an IP address (anything other than 0.0.0.0 = OK). Open any web page to be sure.
Step 6: Set your own Wi-Fi name and password
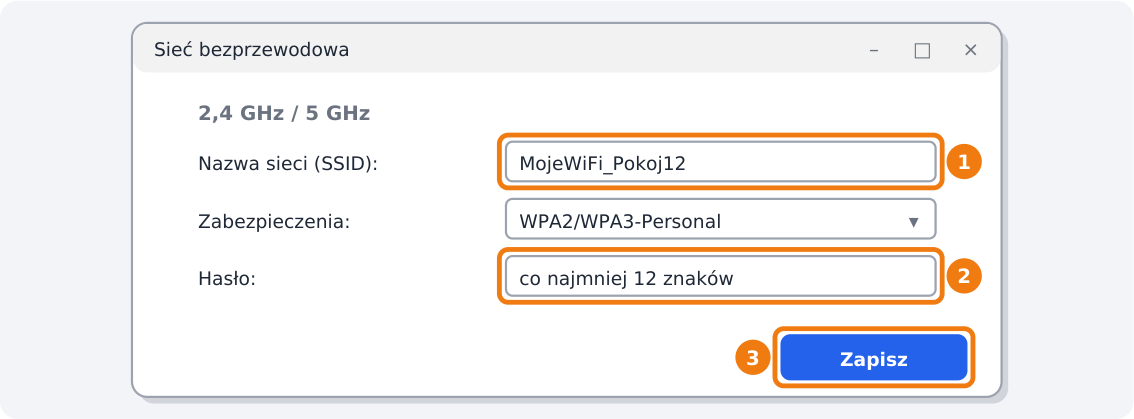
In Advanced → Wireless change the network name and set a strong password (at least 12 characters). After saving, your devices will disconnect – reconnect them with the new password.
Something not working? Common problems
- mwlogin.net does not open
- Make sure you are connected to this router (by cable to a LAN port or to its Wi-Fi) and turn off mobile data on your phone. Try the address 192.168.1.1.
- Status “Disconnected” / authentication error
- Check the PPPoE login and password (case-sensitive). Make sure the cable from the wall socket is in the WAN port, not a LAN port.
- Connected, but only for a moment
- Two typical causes. (1) A second session is running on the same account (e.g. the computer still connects with PPPoE on its own) – turn it off and restart the router. (2) A loose or damaged cable between the wall socket and the WAN port – the router briefly loses link and the session drops; replace the cable and check that the plugs click.
- Internet works for a while, then disappears when nothing is downloading; it comes back after opening a page, or not at all
- The router’s PPPoE settings have connect on demand enabled (Dial on demand / Connect on demand with an idle time). The router disconnects the session when traffic drops and then cannot always resume it. This option must be off: set the connection mode to Always on / Connect automatically (Auto) and “Max idle time” (Idle timeout) to 0 or off. Mercusys: Advanced → Network → Internet → “Connection Mode”: Connect Automatically.
- No connection despite correct details
- Restart the router (power off for 30 s). If that does not help – write to the dorm administration, to akademiki@nette.pl, or call customer service: 81 458 20 20 (Mon–Fri 8:00–16:00).
- I forgot the router’s admin password
- Reset the router with the Reset button (about 10 s) and set it up again from step 2.
ASUS router
RT-AX / RT-AC / ZenWiFi and others with the ASUSWRT panel
Before you start – get ready
- PPPoE login and password from the welcome message (SMS or e-mail) or from the dorm administration.
- The router and a cable (usually in the box). A computer or phone for the setup.
- If you previously connected with PPPoE directly from your computer – disconnect that connection. In our network one account means one connection at a time.
- Second-hand router, or one that behaves “oddly”? Reset it: hold the Reset button for about 10 s (with a paper clip) until the LEDs blink.
Note: your router’s panel may look different
- The pictures are simplified diagrams of the Polish UI, not screenshots. The panel’s look, colours, order and menu names depend on the router model and firmware version.
- Can’t see exactly this option? Look for a similar one: Internet, WAN, Connection Type, PPPoE (Internet Connection Type, Username, Password, Save / Apply).
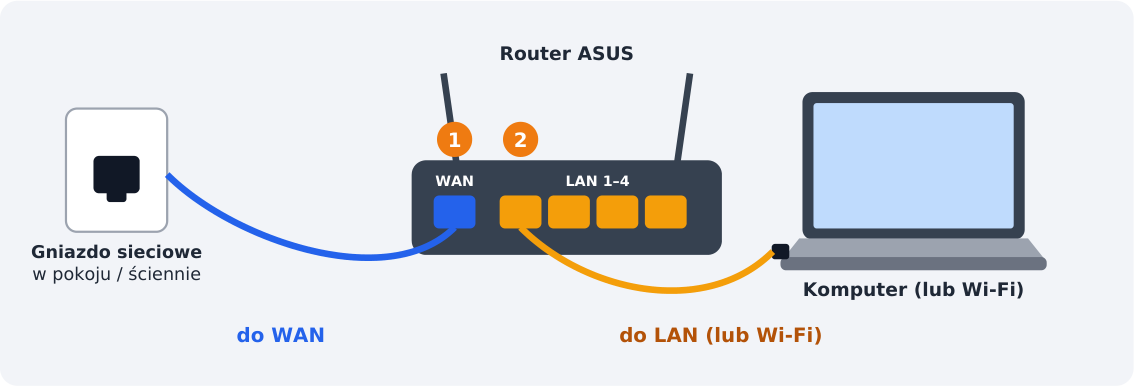
Step 1: Connect the cables
1 Plug the cable from the wall socket into the blue WAN port (globe icon). 2 Connect the computer with a cable to one of the LAN ports, or join the router’s Wi-Fi – the network name and password are on the sticker underneath the device. Power it on and wait about 1–2 minutes.
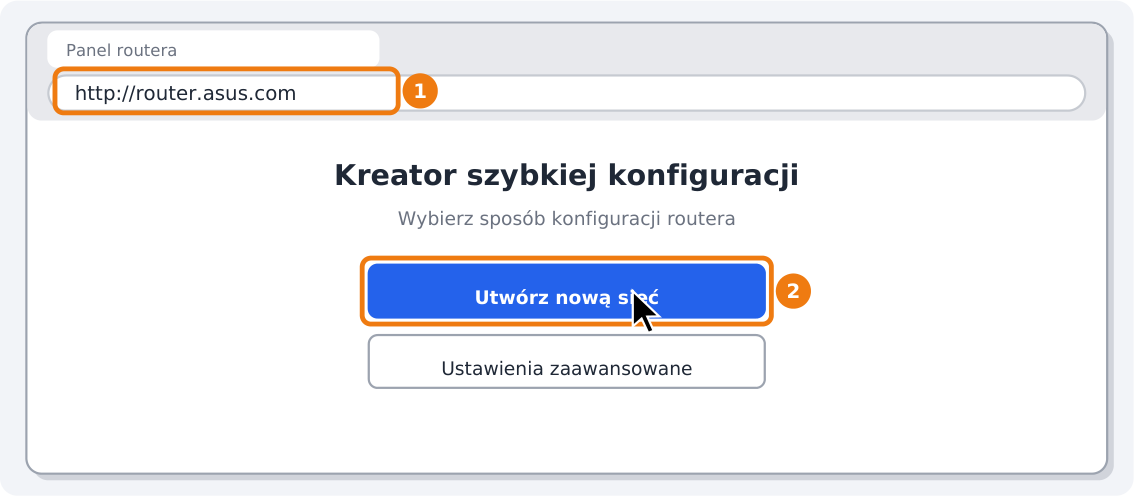
Step 2: Open the router’s panel in a browser
In the address bar type router.asus.com (if it does not work: 192.168.50.1, older: 192.168.1.1). On first run set the router’s admin password – write it down, you will need it every time you log in. A new router starts the Quick Internet Setup wizard (QIS) by itself – it often detects PPPoE automatically and asks for the login and password right away.
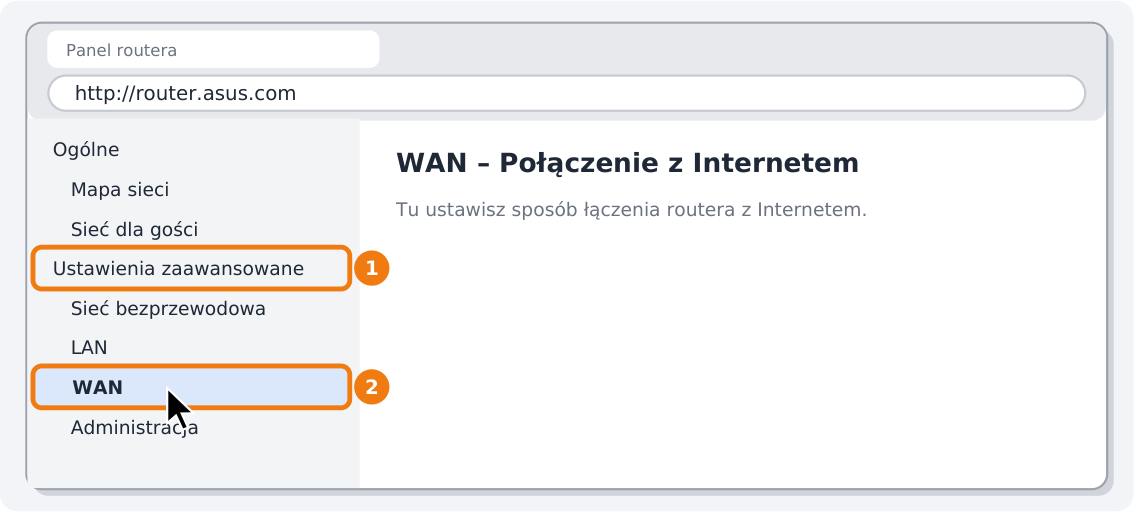
Step 3: Go to the Internet (WAN) settings
Log in to the panel and go to Advanced Settings → WAN, Internet Connection tab. On your model the menu may be arranged slightly differently – look for the Internet or WAN section.
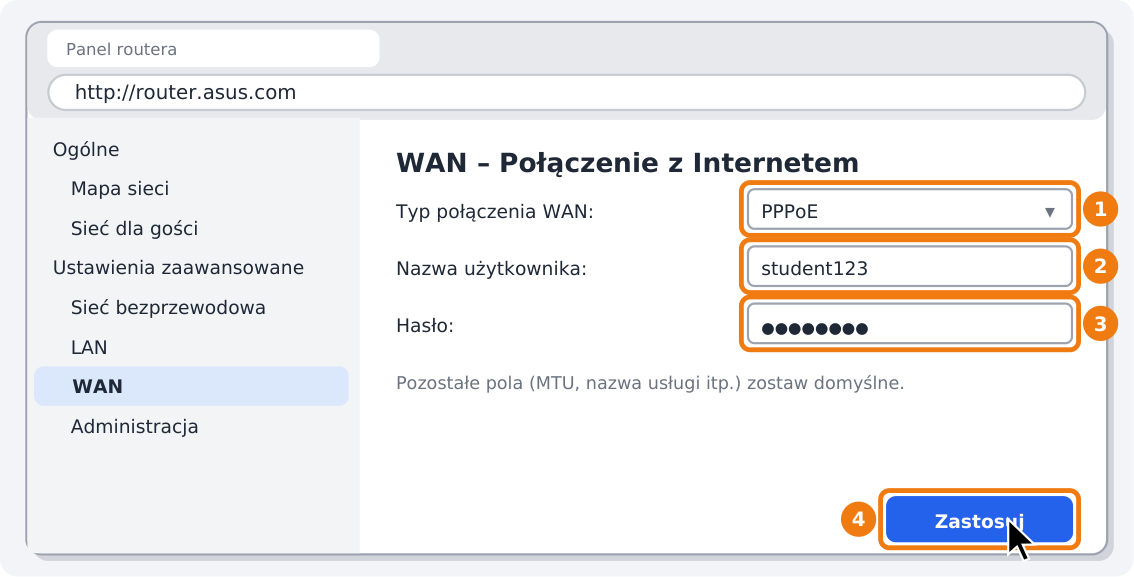
Step 4: Choose PPPoE, enter your login and password
1 Connection Type: PPPoE. 2 Username = your login. 3 Password (and its confirmation, if there is one). 4 Click Apply. Leave the remaining settings (IP address, DNS, MTU, service name) at their defaults.
Step 5: Check that the router is connected to the Internet
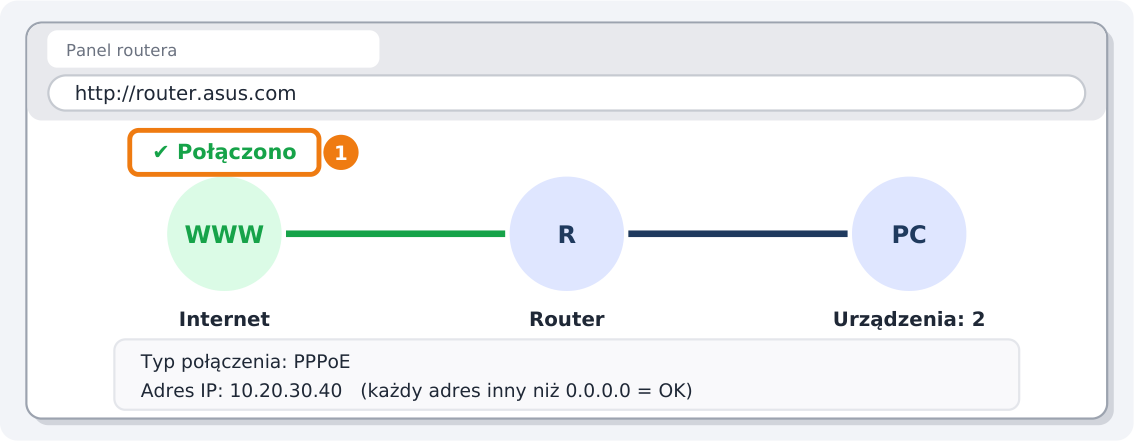
Go back to the panel’s home page (Network Map / Status). The Internet status should change to Connected and the router should have an IP address (anything other than 0.0.0.0 = OK). Open any web page to be sure.
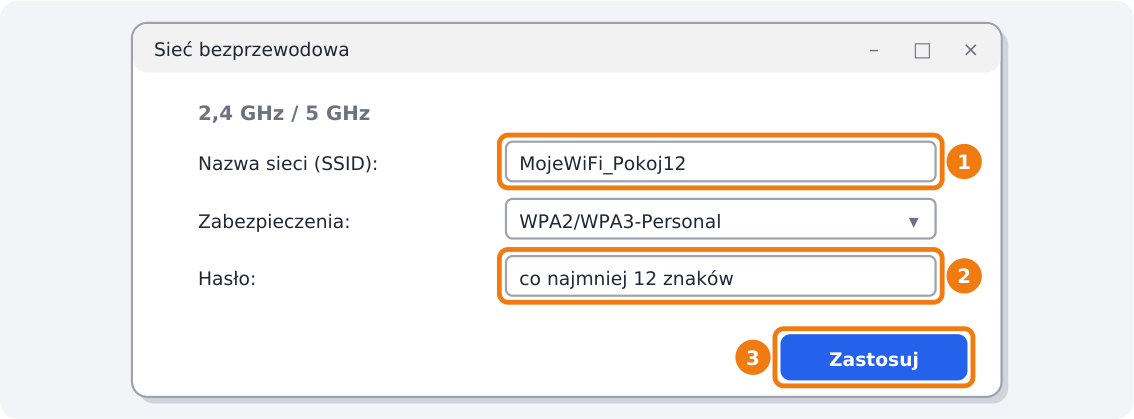
Step 6: Set your own Wi-Fi name and password
In Advanced Settings → Wireless change the network name and set a strong password (at least 12 characters). After saving, your devices will disconnect – reconnect them with the new password.
Something not working? Common problems
- router.asus.com does not open
- Make sure you are connected to this router (by cable to a LAN port or to its Wi-Fi) and turn off mobile data on your phone. Try the address 192.168.50.1 (older: 192.168.1.1).
- Status “Disconnected” / authentication error
- Check the PPPoE login and password (case-sensitive). Make sure the cable from the wall socket is in the WAN port, not a LAN port.
- Connected, but only for a moment
- Two typical causes. (1) A second session is running on the same account (e.g. the computer still connects with PPPoE on its own) – turn it off and restart the router. (2) A loose or damaged cable between the wall socket and the WAN port – the router briefly loses link and the session drops; replace the cable and check that the plugs click.
- Internet works for a while, then disappears when nothing is downloading; it comes back after opening a page, or not at all
- The router’s PPPoE settings have connect on demand enabled (Dial on demand / Connect on demand with an idle time). The router disconnects the session when traffic drops and then cannot always resume it. This option must be off: set the connection mode to Always on / Connect automatically (Auto) and “Max idle time” (Idle timeout) to 0 or off. ASUS: Advanced Settings → WAN → set “Connect on demand” to No, “Disconnect after time of inactivity” = 0.
- No connection despite correct details
- Restart the router (power off for 30 s). If that does not help – write to the dorm administration, to akademiki@nette.pl, or call customer service: 81 458 20 20 (Mon–Fri 8:00–16:00).
- I forgot the router’s admin password
- Reset the router with the Reset button (about 10 s) and set it up again from step 2.
Illustrations are schematic and show the Polish UI (menu names in English are given in the text) – the look may differ depending on the device model and firmware version. · Help: akademiki@nette.pl, BOK 81 458 20 20 (Mon–Fri 8:00–16:00)
↑ Top